When an estimate falls apart halfway through a build, the math usually isn’t the problem. The issue is that something in the plans was not included in the estimate.
A missing quantity. An overlooked material. A dimension that looked minor on the drawing but multiplied across the project once work started.
The step meant to prevent this is the construction takeoff. For residential builders, especially smaller teams where the owner often handles estimating, this step determines whether a bid reflects the full scope of the build or leaves gaps that later become cost overruns and lost margin.
This guide explains how construction takeoffs work, the different types builders use, how materials are measured from drawings, the step-by-step takeoff process, and where digital tools fit into residential estimating workflows.
What Is a Takeoff in Construction?
A construction takeoff is the process of reviewing project drawings to identify, measure, and quantify all materials needed to complete a building project. It’s the foundation of every construction estimate; without accurate quantities, the costs that follow are guesswork.
The term comes from the act of “taking off” items one by one from a set of blueprints: counting doors and windows, measuring wall lengths, calculating roof area, and totaling the concrete needed for a slab.
Each item is recorded with its quantity and unit of measurement, so the builder knows exactly what to order and what the job will cost.
For residential builders and remodelers, especially smaller teams without a dedicated estimator, the takeoff is typically handled by the owner or lead builder. It’s one of the first things that happens after plans land on your desk, and one of the most consequential.
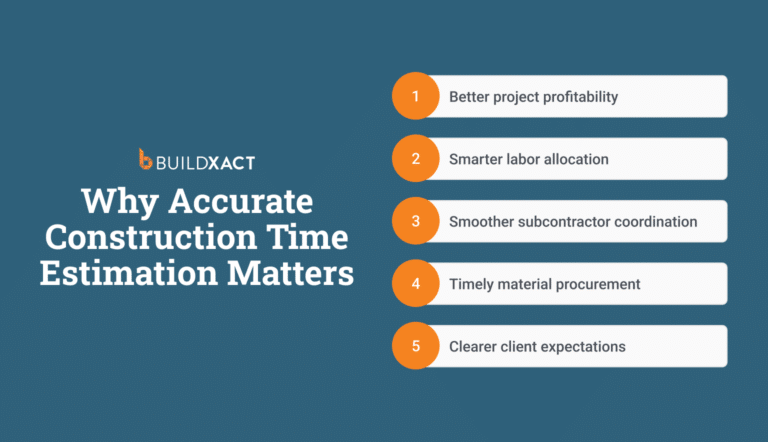
An accurate takeoff keeps your bid competitive and your margins intact. A sloppy one leads to mid-build surprises: materials you didn’t account for, hours of labor you underestimated, or a bid that looked profitable on paper but wasn’t.
Takeoffs can be broken down by type (quantity, material, labor, equipment), and measured in different ways depending on what you’re quantifying. The sections that follow explain the main types of construction takeoffs, how materials are measured from plans and blueprints, and the step-by-step takeoff process builders use to produce accurate estimates.
Types of Construction Takeoffs
Not every takeoff measures the same thing. While the term “takeoff” is used broadly, it actually encompasses four distinct layers, each addressing a different question about the job.
Quantity takeoff
How much space am I dealing with? This is the measurement layer of the quantity takeoff process: linear feet of walls, square footage of floors and ceilings, roof plane area, and the volume of a foundation slab. At this stage, you’re not thinking about specific products yet. Instead, you’re pulling raw dimensions from the drawings to establish a measured baseline.
For a residential builder, this is where you trace the perimeter of a room, measure the roof plane or calculate the area that needs insulation.
Material takeoff
What exactly do I need to buy? This is the purchasing layer that follows the material takeoff process, where measured quantities are converted into specific building materials. The wall area you measured earlier now becomes 15 sheets of 4×8 drywall, a box of screws, two buckets of joint compound and six rolls of tape. Instead of working with raw dimensions, you’re translating those measurements into products that can be ordered and delivered to the jobsite.
For a residential builder, this is where square footage turns into drywall sheets, insulation coverage becomes batts or rolls, and framing measurements become studs, plates and fasteners.
Labor takeoff
How many hours and what trades are required? This is the planning layer of the labor takeoff process, where material quantities are translated into crew time. Once you know what’s being built and which materials will be used, you can estimate the hours required for each stage of the project.
For a residential builder, this step helps determine crew size, trade involvement, and how long each phase of the job is likely to take. Project complexity matters – a straightforward new build typically moves faster than a remodel that requires working around existing structures.
Equipment takeoff
What do I need on-site to complete this? This step identifies the temporary equipment and jobsite support needed to carry out the work. For residential projects, that might include scaffolding, temporary fencing, skip bins, a concrete pump for a slab pour or crane hire for lifting roof trusses.
These items are included as line items in the estimate, so equipment costs are accounted for and project margins stay protected.
How these connect in practice
On paper, these construction takeoffs appear to be separate steps. In practice, especially for residential builders, they overlap. As Just Building Group estimator Steve Griffin describes it, measuring dimensions and tying them to specific materials happens in the same motion: square meter measurements get worked out for tasks like plastering, insulation, and painting, and contractor labor and overhead costs for things like equipment rentals get layered on top to build complete estimates.
For builders who have been doing takeoffs for years, this probably sounds familiar. You’re already doing all four of these every time you measure a wall and figure out what it takes to build it. The distinction matters because when one layer gets missed, especially labor or equipment, that’s where bids come in short, and margins disappear.
Measurement Methods In Construction Takeoffs
Different materials get measured in different ways. Knowing which method applies to what you’re looking at on a set of plans is how you avoid ordering too much, too little, or the wrong thing entirely.
- Count
The simplest method is to tally each item individually: doors, windows, light fixtures, outlets, cabinet units, and faucets. If you’re quoting a kitchen remodel, the count tells you how many cabinet boxes, drawer pulls, and recessed lights are included. Each item gets listed as an “each” in the takeoff.
- Length
Length is measured in linear feet for items such as baseboard trim, top and bottom plates, gutters, conduit runs, and plumbing pipe. When you’re framing a wall, you measure the linear footage to calculate how many studs you need along that run and how much plate stock to order. The assembly does the conversion, but the measurement itself is linear.
- Area
Square footage is the method you’ll use most often in residential work. Drywall, roofing, flooring, insulation, and painting. As Steve Griffin explains, square meter measurements are used for tasks such as plastering, insulation, and painting. You measure the surface, and the takeoff tells you how many sheets, rolls, or gallons that surface requires.
- Volume
Volume applies to anything measured in cubic yards or cubic feet. It could be concrete for a foundation slab, footings, fill dirt, or gravel for site prep. If you’re pouring a 20×30 slab at 4 inches thick, the volume calculation tells you how many cubic yards to order from the batch plant.
- Pitch area
Pitch area is a residential-specific variation of area measurement. A roof isn’t flat, so the steeper the pitch, the more material it takes to cover it. Pitch square footage accounts for the slope, so your shingle, underlayment, and flashing quantities reflect the actual surface area, not just the house’s footprint.
Most items in a residential takeoff fall into one of these five methods. Getting the method wrong and measuring area when you should be measuring length, or forgetting to adjust for roof pitch, is one way a takeoff goes sideways. The numbers look right until the materials show up short.
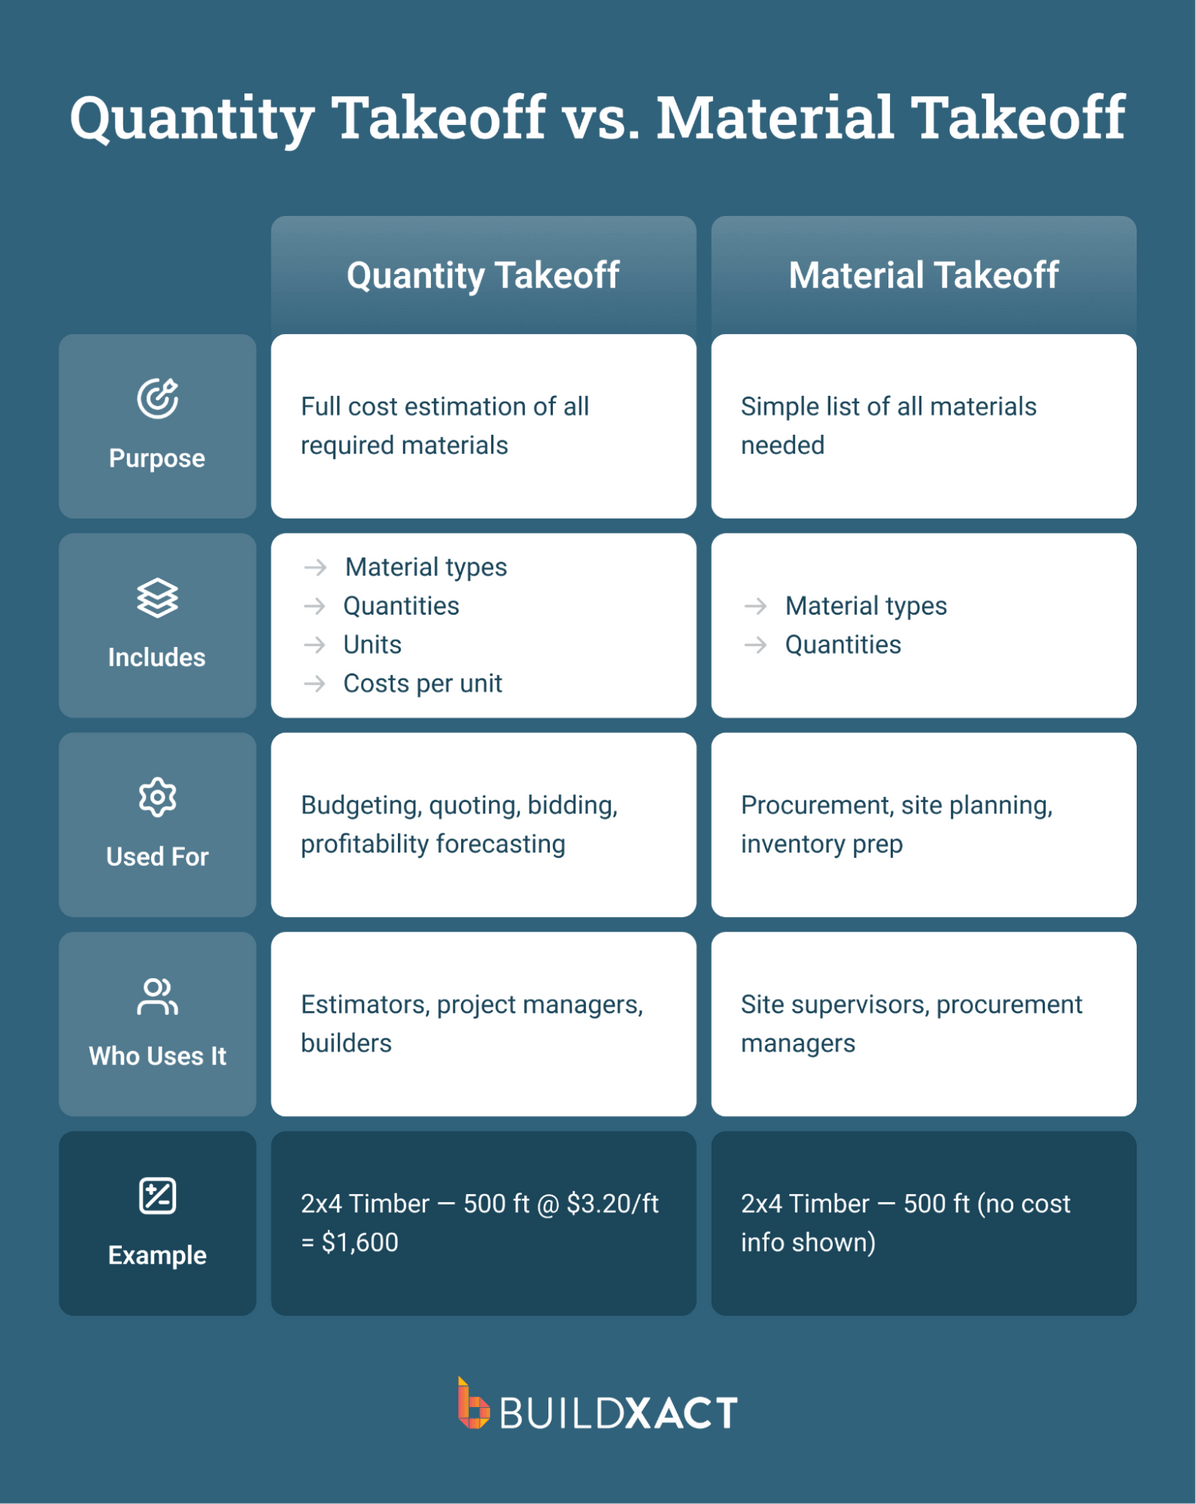
Takeoff vs. Estimate: What’s The Difference?
Builders often use these terms interchangeably, but they refer to two different steps in the estimating process.
A takeoff is the measurement stage. It involves reviewing the project drawings and calculating the quantities required to build the project: how many sheets of drywall, how many linear feet of framing lumber, how many windows, or how much concrete the slab requires. At this stage, the output is simply quantities pulled from the plans with no prices attached.
An estimate picks up where the takeoff ends. It applies costs to those quantities: current material pricing, labor rates for each trade, waste factors, overhead, and profit margin. The estimate is the final project price presented to the client.
The relationship between the two is direct. The takeoff feeds the estimate.
If the quantities are wrong, everything downstream is wrong too: material costs are off, labor hours don’t match reality, and the price you bid either erodes margin or prices you out of the job.
For residential builders who handle both steps themselves, the line between takeoff and estimate can blur because measuring and pricing often happen in the same sitting. But keeping the distinction clear helps pinpoint where problems start if a job doesn’t land where you expected.
Manual vs. Digital Takeoffs
There are two ways to complete a construction takeoff: manually or with software. Both follow the same logic: measuring quantities from drawings and translating them into materials and costs, but the workflows differ significantly.
Manual takeoffs
For decades, builders completed takeoffs using printed plans, rulers, and spreadsheets. Drawings must be printed at the correct scale, and every wall, roof, and slab is measured by hand. Materials are then listed in notebooks or spreadsheets while builders track completed measurements directly on the plans.
The process works, but it’s slow and prone to mistakes. A misread dimension, incorrect scale, or small data-entry error can throw the entire estimate off. Updating the takeoff can also become time-consuming if plans change or material prices shift, because quantities and costs often need to be recalculated manually.
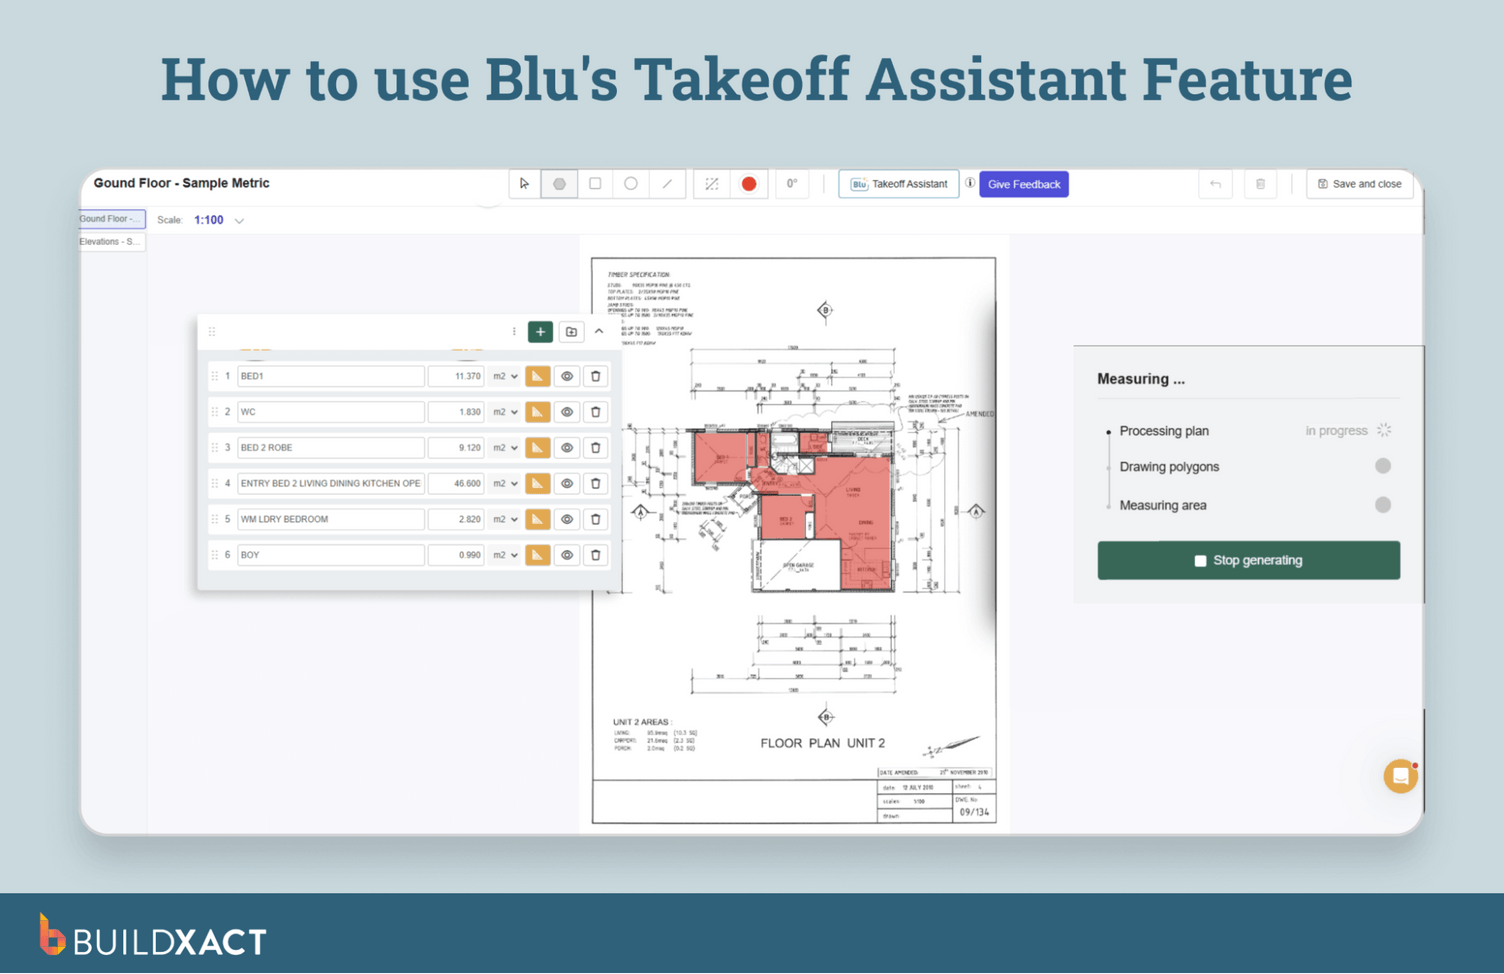
Digital takeoffs
Digital takeoffs follow the same estimating logic, but the software handles the calculations and organizes the data automatically.
You upload PDF plans into the platform, where the software sets the drawing scale. Measurements are captured directly on screen by clicking points or tracing lines across the plans to calculate lengths, areas, and quantities.
Where digital tools make the biggest difference is what happens after measurement. Instead of manually transferring quantities into a spreadsheet, measurements can be tied to prebuilt material assemblies. Measuring a wall can automatically generate the drywall sheets, framing lumber, fasteners, and labor required to build it.
Digital takeoff tools also make updates easier. If plans change or a client requests a revision, you can adjust the measurements on screen, and the system automatically recalculates quantities and costs.
Which method works best depends on the builder
Builders quoting only a few projects each year may find manual takeoffs manageable. But teams bidding regularly on new work or dealing with frequent plan revisions often reach a point where digital tools reduce the time, errors, and rework involved in estimating.
The Construction Takeoff Process Builders Use to Produce Accurate Estimates
Every takeoff follows the same core sequence, whether you’re working from paper plans or a screen. The difference is how much of the work you do by hand versus how much the software handles for you.
1. Review the construction drawings
Before measuring anything, review the full set of plans: floor plans, elevations, sections, and any engineering details to understand what the project involves. This is where you catch scope issues early, such as a set of plans that looks complete but is missing a cross-section detail, or specs that call for materials you weren’t expecting.
For residential work, this is also where you decide whether the job fits your crew, your timeline, and your capacity. Not every project that lands on your desk is worth quoting.
2. Create a material list
Work through your drawings by section: foundations, framing, exterior envelope, interior finishes, mechanical, and electrical, then list every material the job requires.
From framing timber to fixtures and finishes, the goal is a complete inventory of what needs to be purchased and installed.
In a manual process, this means working from notepads or spreadsheets and cross-referencing specs to ensure you list the right type and thickness for every material. With digital takeoff tools, this step merges with measurement: you trace an element on the drawing, and prebuilt assemblies automatically generate the full material list.
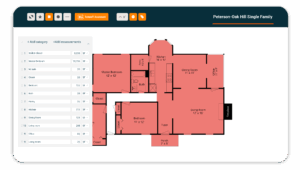
3. Measure quantities and dimensions
This is the core of the takeoff. You measure wall lengths, floor areas, roof pitches, and slab volumes, and count individual items such as doors, windows, and fixtures. Every measurement gets recorded with its quantity and unit, so the material list has real numbers behind it.
Manually, this means printing plans to scale and working with a ruler page by page.
With software like Buildxact, you upload your plans and complete takeoffs directly on screen. The software automatically scales the drawings and calculates lengths, areas, and quantities as you measure, while marking completed sections to prevent double-counting.
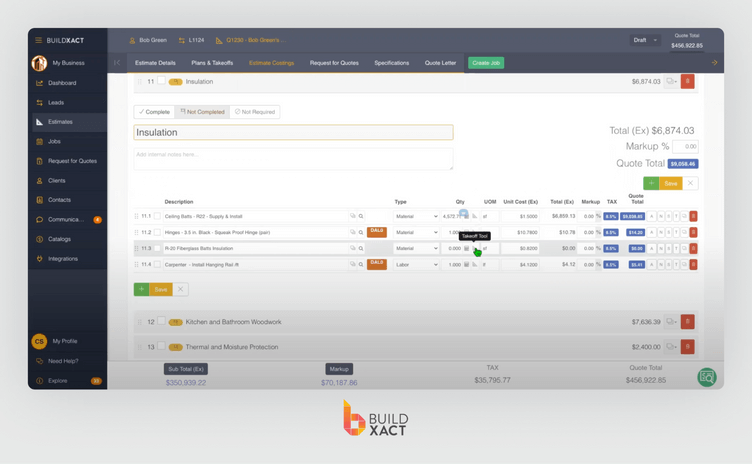
4. Apply material and labor costs
Using the quantities from your takeoff, calculate the cost of materials and the labor required. Larger and more complex builds typically require more hours or more specialized trades.
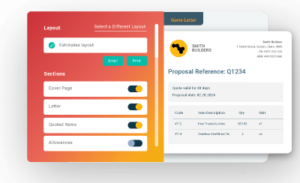
In a manual workflow, this is where you call dealers for pricing or look up costs from old bids, and then enter everything into a spreadsheet by hand. With Buildxact’s real-time dealer integration, live prices pull directly from your dealers into the estimate. When a dealer updates their pricing, your estimates automatically reflect it. This means no phone calls or outdated pricing data.

5. Calculate labor costs
A detailed labor cost gets developed for the project based on estimated hours and the trades involved. For residential work, this includes your own crew time plus any subcontractor quotes like framing, electrical, plumbing, roofing, and concrete.
With takeoff software, labor rates can be built into the same assemblies that generate material lists. You measure the wall, and the system calculates both the materials and the labor to install them in a single step.
6. Add overheads and profit
Finally, factor in administrative and operational costs: insurance, permits, site supervision, vehicle costs, and your markup. The result is the total price presented to the client.
The system calculates material quantities, labor, and total costs, providing an instant line-by-line breakdown. You review the data, add markup and waste, and generate a professional bid.
Accurate Takeoffs Are the Foundation of Reliable Estimates
A takeoff determines whether an estimate reflects the real scope of the build. When quantities are incomplete or measured manually across plans and spreadsheets, mistakes surface later in material shortages, unexpected costs, or bids that no longer hold once the project begins.
Digital takeoff tools help keep quantities and costs aligned. Measurements come directly from drawings, materials are calculated automatically, and estimates update as plans evolve.
Builders spend less time double-checking quantities and more time pricing work they can confidently take on.
Buildxact connects takeoffs, estimating, and job cost tracking in one system built specifically for residential builders. Quantities measured from plans flow directly into the estimate, helping teams price jobs faster and keep their numbers aligned as projects move forward.
Start for free or book a demo to see how Buildxact simplifies the takeoff and estimating process.